This section is under construction and incomplete, please visit later when all the information is in place. If you sign up to the 'Auto Updates' (select from the menu) you will be notified of any changes, this will save you time paying frequent visits to the site to look for changes.
'TugaTube'
This section will explain the 'tube method' of restoration, often referred to as 'the pill tube' or 'Film Canister' methods.
The tube method is no more than T-tape but with the rigidity of a 'former' to hold the tape. The method has the basic advantage of being more stable and allowing more precise tension on the skin and where the tension is applied.
The description and method will be given using an example of a simple device available from the e-shop which is a modified and improved version of the film canister. It should be easy to see from this example how the pill tube and film canister is used or how you might engineer your own device along the same lines if you prefer. All the component parts are available separately.
The advantages of the 'TugaTube' over the basic method are as follows:
| A plastic tube machined to aid tape to stick to it | |
| Greater rigidity of the tube | |
| Radiused edges to be kind on the skin | |
| Stout Stainless Steel loop for tensioning | |
| Selection of lengths and diameters (at the moment the range is limited so if the size you want is not listed on the e-site please e-mail to see what can be made available. |
Special features that have been incorporated are:
| Machined groove 12mm (1/2") from the end of the tube | |
| Two o-rings that can be fitted into the groove as anti-pinch rings. | |
| The use of double sided adhesive tape to secure the hypoallergenic tape onto the tube |
TugaTube
 |
 |
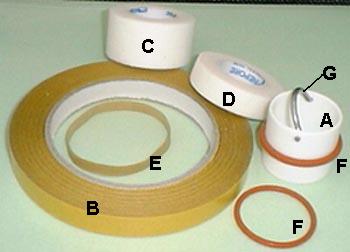
| Kit with rings and tape (fig.1) | Tugatube and the two anti-pinch rings (fig.2) |
In pictures (fig.1) and (fig.2) are the following components:
A) TugaTube
B) Double sided tape
C) Hypoallergenic tape 25mm (1")
D) Hypoallergenic 12mm (1/2")
E) Elastic band
F) Silicone anti-pinch rings, one thin one thicker
G) Stainless Steel loop
The TugaTube comes in 30, 40 and 50mm lengths, the one shown is the 30mm version.
Below are step by step instructions on how to apply the tape and use the TugaTube or indeed any home made version.
Fitting Details
First the tube must be prepared and here are the steps:
Step 1
Make sure that the tube is clean dry, free from grease and adhesive residue, free from nicks or sharp edges that may cause sore skin.
Step 2
Stick the double sided tape to the tube. It may seem obvious but to do this correctly you should take the roll of double sided tape in one hand and with the other attach the start of the tape to the outside of the plain end of the tube (opposite end to the handle?. Position the tape so that it is in line with the edge of the machined groove (fig.3). Apply the tape all the way round, pulling the tape taught as you go to avoid wrinkles. Cut the tape and it's backing paper so that the tape overlaps slightly (fig.4). Firm the tape onto the tube by pressing hard over the backing paper. Hold back the overlapping tape whilst with a sharp scalpel, blade or tweezers, tease the backing paper from the adhesive film , then put the other free end onto this section (fig.5). Then remove the backing paper and save for the next step (fig.6).
| Applying double sided tape. (fig.3) | Cut tape and firm down. (fig.4) |
Step 3
Prepare the tape for application to the tube. This involves the Backing Paper from the Double Sided tape and the 12mm (1/2") Hypoallergenic tape. Stick the Hypoallergenic tape to the non-stick backing paper and cut to the same length (fig.7)
| Overlap adhesive film(fig.5) | Remove tape and retain backing paper (fig.6) |
Step 4
Stick the non-sticky side of the 12mm hypoallergenic tape to the exposed tape on the tube and press firmly onto it using the backing paper to protect the adhesive (fig.8). When the backing paper is finally removed you will have hypoallergenic adhesive tape firmly stuck to the end portion of the tube, but, with the sticky side facing outwards ready to stick directly onto the skin. At this stage leave the backing paper on the tape to protect the adhesive.
| Stick 12mm tape to backing paper (fig.7) | Stick 12mm tape to the tube (fig.8) |
Step 5
At this stage you can put the correct anti-pinch ring over the tube or ease it into the groove if it is already on the tube (fig.9). Each ring gives a different 'hold off' height for the tape over the outside skin. Thin skin may do best with the thin ring or thicker skin with the thick ring, you should determine this by trial and error. The tube is now ready for you to apply to your penis.
| Anti-pinch ring into groove (fig.9) | Condition skin [Optional] (fig.10) |
Step 6
Conditioning the skin (optional). You can condition the skin by pre-tensioning it or stressing it just before applying the tube. This will force blood from the capillaries and thin out the skin so that it is more likely to remain secure to the tape when under tension. This will reduce the chances of tape failure and slippage which is a major cause of sore skin.
Hold your penis by the glans/inner foreskin in one hand using thumb and forefinger in a ring formation. With the other hand do the same but draw finger/thumb down towards the base of the penis a few times. It does not need to be done with excessive force as this will only make the skin sore (fig10). This process may have the effect of inducing an erection or a semi-erection, if that happens then the worth of this stage is reduced so consider leaving out the process.
| Lubricate inside of tube (fig.11) | Remove backing paper (fig.12) |
Step 7
Applying the tube. Make sure the shaft skin (that up to the scar line or junction of inner foreskin from the pubic area) is clean and dry as this is the area that the tape must adhere. With this method the adhesive tape never comes into contact with the inner delicate foreskin, it only sticks up to the edge of the scar line/junction. You may need to lubricate the inside of the tube to help with the positioning of the tube, if you do, make sure you use a water based lubricant and do not use more than needed or the adhesion may be suffer (fig.11).
Remove the backing paper from the tube, again the sharp blade or tweezers will help lift the paper (fig.12).
| Position edge of tape(fig.13 | Method for tight shaft skin(fig.14) |
WARNING, never allow the glans to protrude beyond the end of the tube. It is safe to allow the glans into the tube but if protrudes beyond the open end there is a great danger that the blood may engorge the glans and it may be trapped by the swelling. If you need to reach further down the shaft to reach the scar line then you should use a longer tube (up to 50mm, 2").
There are two ways of applying the the tube to the skin and they are shown in (fig.13 & 14). In (fig.13) you can see that by tilting the tube you can locate the edge of the adhesive onto the edge of the scar line/junction. In (fig.14) the tube is pushed over the glans to reach the scar line/junction, this is the preferred method if the skin is tight.
Once you have positioned the skin and tube, push the skin over the adhesive tape and press firmly (a couple of minutes if you can) to ensure good adhesion, this process is essential (fig.15).
| Firm tape against skin(fig.15) | Outer layer of tape(fig.16) |
Step 8
The outer tape. Wrap a layer of 25mm (1") tape round the outside of the tube and skin with moderate tension on the tape, also with a slight forward stretch on the tube (fig.16). It is important that the tape is in intimate and firm contact with the anti-pinch ring and that the tape does not go much forward than the end of the tube that is now under the skin. Firm the tape against the skin as shown in (fig.15).
Secure the tape on the other side of the anti-pinch ring by using the elastic band. This can be seen in (fig.17).
| Optional layer of tape(fig.17) |
Step 9 (optional)
An extra layer of 12mm tape can be applied over the skin end of the 25mm tape to give extra inward pressure to keep the adhesive layers firmly stuck to the skin (fig.17). A slight tension on the tape must be made to slightly stretch it as it is applied but BE CAUTIOUS that you do not use so much tension that the circulation is cut off. While the tape is being applied a forward tension similar to that which you intend to use in restoration should be applied.
You can now lubricate the glans and inner foreskin with a water soluble lubricant is you have not already done so through the end of the tube.
You are now ready to attach your tensioning device which can be any of the usual methods outlined elsewhere.
| Urinating(fig.18) | Possible plug of soft tissue (fig.19) |
Urination
This is a simple affair. Uncouple the tension from the loop, fold it into the tube and push the tube back to expose the tip of the glans (if you can), then steady the urine stream downwards (fig.18). Once urination is complete, squeeze the last drops and dab the excess off with a soft tissue. You may want to plug the end of the tube with soft tissue to catch any drips but it should not be necessary to 'pack' the tube (fig.19).
Ready to tension:
This method is best suited for use with elastic or spring as the tensioning device either down the leg or round the waist. It is not recommended to tension upwards in case either elastic or tube comes loose so causing a DANGER of injury to face and in particular the eyes.
The use of a hook onto the loop makes it easy to detach for urinating.
©elks2004 Page last updated 14th November 2004